Pages

Saturday, November 3, 2012

Adv Digital Painting - Landscape

We had to replicate a photograph of landscape with architecture in there.
The original image is on the left. The source is also watermarked on the image.

Wednesday, October 10, 2012

3D Modeling - Widgets


Our next assignment was to create these widgets from this image on the bottom. The ones marked by the 1 and 2. Anyways, I'm getting tired of double posting my progress even it's just a simple copy and paste. I have to post it for school too, so I'm just going to post the final piece.

3D Modeling - Widget Tutorials

Our first real assignment for 3D modeling was to follow these three tutorials to make 17 widgets. It's mostly to learn how to use the program to a certain degree.

Inorganic Modeling Fundamentals : Part 1
Inorganic Modeling Fundamentals : Part 2
Inorganic Modeling Fundamentals : Part 3


Tuesday, October 2, 2012

Adv Digital Painting - Apples


Our first assignment is to render these green apples on Corel Painter. Well it was pretty straight forward. The assignment focuses more on technique. I also saw it as an assignment to learn the program. Honestly, I prefer recording this, but I was working on the school computers which doesn't have Camtasia. I will probably start working on my laptop again just to record my process.


Process
---

I started off with a grid [Canvas > Grid]. I set my options to 100x100 pixels. Then I drew the apples pretty quickly.


Then adding color for one apple. I decided to work with the back first for no particular reason. But I decided to do one apple at a time because of different textures.

For the texture of the apple's skin, I used basic paper. I just upped the size and contrast of the paper and drew the texture in one stroke. If I did too many strokes, it would lose the texture I wanted.


I got carried away for the next part. The skin on this one didnt turn out too well, but I could still use it with some tweaks. 

The inside of the apple was pretty fun. I used the same texture except this time I overdid the strokes. It would leave little dots for the texture. So I decided I can use this. I deleted it, threw the apple skin color all over the sliced apple, then I redid that texture with the right color and it produced the inside of the apple. I just needed to clean it up some more.

I got most of the assignment done, so I cleaned and added more detail to the sliced apple. I used the regular pencil to get the lines of the inside of the apple. Then I used the square conte on 10% opacity which still would still heavily get on the canvas. I also removed a lot of the extra dots inside the apple.


I got carried away again here, so I missed out on a lot of stuff. The color for my apple felt really dull. So I grabbed a green from the original picture again and it worked. I also didn't like the shadow of the apple, so I pretty much removed it for now. I just wanted to make the color richer. I also redid the highlights and the shadow at the top of the apple.

From a distance, or from just looking at the navigation box, the two apples blended into each other. So I dropped all the layers, floated, and duplicated. Then I removed one apple in one layer, and removed the other apple in the duplicated layer. Then I adjusted the value without having to interfere with the other apple. I also decided to clean the edges of the apple.

Now I had to add the shadow back in. I took the square conte, made it really huge, and make a simple short stroke on the apple. It took a few tries until it got where I wanted. Then I erased where the sliced apple would be. Then I brought down the opacity of this layer.

I created another layer and added the same texture. This time I continued where I left off and moved upward. This would cause the two layers to overlap and make it darker. It would also darken the top right a little. Then I erased again and dropped the opacity.

For the darker shadows, I created another layer and used the airbrush. Then I dropped the opacity for that layer down, added the stem.


Friday, September 7, 2012

2D Animation - Coat

This assignment is to animate a character entering a room, putting on a coat, and leaving the room. This assignment teaches how to interact with objects that's on a different layer.


Process
--------------

04 Sept 2012

 I started thinking of ideas. I tried to draw them out with as much information as possible. Enough information would be the background telling the story about the character and grabbing your eye's attention to a certain place.

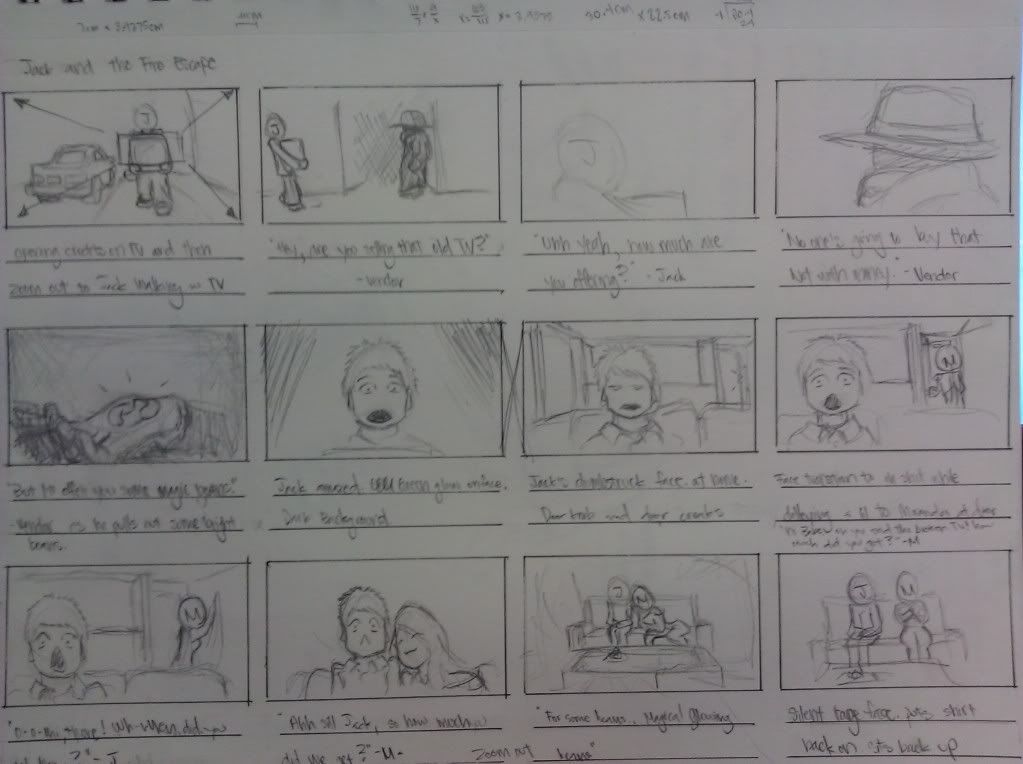
For some reason, I kept thinking outdoors. I wanted to do a person getting out of a car, putting on a business suit, and walking away from the car. I also wanted it to be funny, so I wanted the business man to be out of context completely. I couldn't think of anything to support this. A few thoughts were in the desert and he's wearing shorts. Another idea was him in the ghetto. I didn't like any of the ideas so it was scratched.

My next idea came from a story I made up awhile back. It was going to be a shack in the woods. The only problem was he would be leaving the shack while putting on a jacket. It wasn't interesting enough either so it was scratched.

I finally came up with one indoors. I originally wanted it to be inside the shack. Since I suck at detail like drawing wood texture on the walls and furniture. I also didn't know how to set up the "camera." So I drew out a floor plan sort of and planned what I wanted in the shot. It actually didn't help much. I just kept drawing until I liked it.


I kept the apartment simple with a couch, tv, and coffee table. To keep our eyes away from it though, I just made it dark. I made the only source of light coming from the room. Although, I might add another light over the table, which would make sense realistically.

So I originally wanted a yellow tint because of the florescent lighting, but it turned green. I changed it to blue since I figured I'd make it a cold day, but it didn't export so well in ToonBoom.

05 Sept 2012

I recreated the background in ToonBoom and spaced out the key animation so I can tell what's going on better. Of course, this isn't the final timings. I also made a reference video that morning. It was mostly to capture certain movements, but this video is obviously not going to be copied exactly. For instance, when I put my left arm through the jacket, my arm is pointing to the left of the screen. In the animation, I'll be having the arm pointed either towards the camera and/or towards the coffee cup.

Some things I had issues with were the leg positions when the character is behind the table. It was pretty difficult to imply the legs still moving and taking steps with very little space. The easiest fix would be to just draw the whole leg.

Doing this fixed my other issues like the movement of the body through out the animation. Mostly putting on the jacket and spinning. I had the character step back when trying to put the other arm into the sleeve, and then step back forward once it got in. The spinning was solved also by extending that leg out towards the end of the spin. My character would spin and then stop and spin in place. 

The next thing was timing. I had to constantly give myself more and more frames to work with. I still think the animation is a tad too fast, so I plan on adding a few more frames.


Tuesday, September 4, 2012

2D Animation

Sorry for the lack of updates. Here's two 2D animation assignments.

Dialogue

We took a segment from "Who's on First Base?" and created an animation with it. I chose a segment that had a clean start and a clean end. The dialogue is also pretty fast, so I chose a slower part of the script.


Bow


The next assignment was to animate a character walk on stage and bow. It was suggested to do the bow at a quarter view so we wouldnt have to deal with foreshortening.


This assignment was pretty straightforward. I created a stage, found the middle and had my character walk out from the far side. I decided not to do the closer side, because I wanted to practice with a walk cycle at a different angle.
It was sort of difficult. It felt harder to animate the twist in the hip and shoulders mostly. After I fleshed out the character, it just looked better than I expected.
The bow was pretty straightforward. I had the bow ease in slower. It pretty much skips the downward motion to the bottom of the bow. Then it was pretty much the same on the way up, except the body stays bent forward.


3D Animation - Luxo Jr Hops and Take

Our assignment was to add a Tex Avery like cartoon take at the end of our three hop animation. I used http://www.youtube.com/watch?v=lVN1Apz45AE for reference.


Monday, August 20, 2012

Sketches - Face practice

I decided to try and conquer my weakness. I started to do sketches of faces. I even started one where I draw the head at 15 different angles. It was pretty challenging.
But if I can draw anyones face at 15 different angles and still be able to tell its that person. Then mission accomplished.


Tuesday, August 14, 2012

Digital Painting - Landscapes

The original image is on top. The replicated image is on the bottom. I took an image off facebook that a friend has taken and I just redraw it on photoshop. I use multiple layers for setting up the project, but the replicated image is just one layer. 

This was my first landscape drawing on photoshop. I figure it looked decent enough to upload. Plus it wouldn't hurt to show my progress on this.

Some major issues I had was the water texture, solid lines for architecture, and grabbing minor detail.

Water is tricky, I am going to have to see how people do this. The solid lines for architecture was sort of difficult, because I'm not used to the switching my "medium" from a soft edged object to a hard edged. I ended up blocking the buildings in with the soft edges and just that threw me off completely.

The detail in the bridge was just too much for me. Mostly getting a straight line for the bridge and then the buildings.

For this image, I knew what I had difficulties with and I think they were addressed pretty well.

First off, there was no water, but I had clouds instead. I tried a few methods. I found it more successful to start from the very back and work forward and then working backwards again to touch up some areas. I had issues getting the gray sky with some orange in there, but the easiest fix was to jsut get a large soft brush and go over it with a transparent gray.

I think I got trees down to an extent with a default photoshop brush that I adjusted. Something I learned was getting that bright effect. Although it's not as bright as the original image, I outline the trees with the orange from the sky, then I go back and fill in the sky with the right color. Last, I put parts of the tree back on top of that orange.

The main thing that needs to be looked is accuracy. Although it wasn't my focus here, it will be something I will keep an eye on next time.


Sunday, August 12, 2012

3D Animation - Luxo Jr Hops

Assignment was to animate a Luxo Jr the lamp to do three hops/jumps. It was supposed to be 75 frames, but here's the original.

2D Animation - Dog Jumping on Box

This assignment was just to have fun and be creative with a dog jumping on a box and getting to the other side. Only a rough was due, but I did get quite a few nudges to complete it.


Progress
---


3D Animation - Human Jump

3D Animation - Human Jump from Robinson Luu on Vimeo.

Sunday, August 5, 2012

3D Animation - Bouncing Ball

Easy assignment to do while learning Maya. Probably will upload another video to make the ball bounce faster

Sunday, July 22, 2012

Dog Walking

assignment was to animate a dog walking. I used my dog Emdi as reference of course. The bad thing is that he's a weird little dog. Instead of walking with like the back left and the front right legs, he moves his back right then his front right.


Process
---
  I tried starting off with getting the anatomy somewhat correct. Then I tried to get the movement of the legs. Afterwards I slowly started getting the lines of the body and the legs. I started the animation in place so I can get the timing down somewhat correctly. Afterwards I used the back foot of the dog as an anchor and made the dog actually move across the screen. Just so I can fix the placement of the legs. When I was done with that, I the dog back to walking in place by using the dogs back as an anchor. I went back and did lots of corrections. One of the important ones were the leg placement. It would cause a weird break in the animation because the line on the back right leg would end up being used for the left leg in the next frame accidentally. So I had to go back and move the right and left leg away from each other a little more. Another was the tail and head. Also the body seemed too long and the legs seemed too long, So i made some legs thicker, and made increased the body height. I originally wanted the dog to look to the side and then keep moving forward but the dog would constantly look to the left so I dropped it.

Tuesday, July 17, 2012

Metronome

Assignment given the first week is to create a pendulum using only 16 frames at two exposures. It was originally 16 frames total because students were having issues. I just happen to not think correctly and had already set my mind animation to 16 frames at two exposures.

I chose a metronome because I figured a ball on a string was too typical. Another reason was because a non mechanical pendulum would eventually lose momentum per swing. It would cause the ball or whatever object is at the end to not rise as high as before. The animation has to be able to loop, so I decided to use a metronome.


Thursday, July 12, 2012

Digital Sketches

I learned about this website called lovecastle.org. All I have to say is that it's really beast for practicing to draw without leaving the computer. Each model took about 5 min each.


Tuesday, May 29, 2012

Pushing and Lifting

Animation of a character pushing and lifting a heavy object.

Progress
----
29 May 2012

Decided to do the lifting part of the animation first. I could just do the pushing part later and combine the two clips together. I decided to use a crate with a handle. I figured it wouldn't be allowed, so it'll break off later. I thought of an interesting way for the character to lift the object. Although it feels like I'm skipping a part of the actual lifting. But I'll make up for it with something more complex! We'll see if I can make this animation a beast. I decided to upload a clip of what I have so far rather than an image of onion skins. Its basically just keyframes. I noticed the character gets smaller towards the end so I'll fix that next time.


5 June 2012
Here's what I have so far. Things I've noticed with some issues are the body movement when the handle breaks off and towards the end. Going to go back to fix and clean it up later. For now, I'm going to work on the pushing part which is going to go before this lifting part


2:15 PM
Something I forgot to mention in the previous video was that I was experimenting with stretch and pull. In earlier animations, I didnt apply any. I did apply the stretch for the humanRun, but I didn't like how it turned out. Maybe I didn't like that style, or it wasn't needed at all. Not really sure. I liked how the bird flapping its wings turned out. Well only the tip of the wings, but it was mostly the drag from the wind. I tried applying this to the whole body. The side that travels more will get more "spikes" while the side that traveled less would get small "spikes." I guess these "spikes" are also speed lines but not exactly as it stretches the image onto the line, rather than just lines.

 After watching some anime, I went back and just hit the "Next Frame" hotkey, so I could learn how they do timing. For something quick and short distance, it's usually the initial position, easing out of the position, and then the final position. That's it. Three frames at two exposure. I tried this in various places. I also pushed myself to do two exposure rather than one, because it indeed still looks good and less work. I even gotten lazy and even did 3 exposures in some areas that needed pauses. If I ended up doing a four exposure I just went in and added a frame in there. If I had two 3 exposures next to each other I wouldve just made it to two 2 exposures while adding a frame in between. Unless it was just a long pause.

A small thing I learned with the crate in the lifting video was that the crate is heavy and will ALWAYS want to go back down. I had to adjust the crate to fall slowly even though the guy is still holding it.


And finally just did some cleaning. Might have to go back and fix a little more.

Monday, May 21, 2012

humanRun

Human Running.

It was a pretty fun assignment. One of my favorites mostly because I believe that I am pretty knowledgeable about how the human body moves. At least the basics. I decided to leave this at one exposure because I didn't want to waste my keyframes. It did end up leaving more work. I did have some trouble at the start where I wanted to exaggerate the running, but it turns out to look like the figure is leaping but oddly since only the hip moves and the shoulders are practically in the same location. I ended up having to redo the whole assignment. I like it much better now though. I remember what I learned in another class about what a past animator had done, so I tried it here. I think it works out ok? I'll just post both

Original

Stretching in the leg

Sunday, May 13, 2012

Emdi

I just gotta say that this is beast! I honestly don't know if I should finish this completely or leave it as is. The background is just there, no real meaning besides that he's indoors. Actually maybe I should finish this one day to practice backgrounds and adding textures. His paws needs some work too.

For now reworking a picture of Nidalee I've done in the past for a friend. I'm hoping it becomes really beasty and goes on the LoL showcase. Going to need a lot of texture for her outfit though. This is all being done digitally on Photoshop with a Wacom tablet

Tuesday, May 8, 2012


Don't think I'm going to finish this. It was just to learn how to get a nice range of value without it looking all muddy. And photoshop is cheating with its warp tool. Could've pushed the contrast in the shirt a little more, but I got the main concept and skill down. Success!

Tuesday, May 1, 2012

Jack and the Beanstalk Twist

Objective was to pick a fairy tale and put our own twist to it. I chose Jack and the Beanstalk. Throughout this piece, it feels like my quality drops tremendously. I will pick the quality up for the final version of the animatic.


Progress
----

storyboard

Animatic


It was rather long, so I decided to compact it as much as possible. Instead of Jack making multiple trips, he just makes one and gets caught right away. A lot of elements in the story were lost and randomly appeared. I somewhat created a link in the animatic. There are still issues and hope I fix them in the final version. Hopefully a cleaner version also. I plan on dropping Toonboom Storyboard or whatever its called and just go with Photoshop and AfterEffects. With this switch, I can get better control in the individual animations like objects flying across the screen rather than screenshots of them going across.

Thursday, April 26, 2012

Eyeball

Practicing drawing on photoshop with color. Probably could've used soem reference for the top eyelid but class was ending. The iris didnt turn out as round as I had hoped but not bad imo. Learned a little from this exercise.


1 May 2012
----
Added texture. It does wonders. I shall do this in future digital work. Although it feels like cheating by grabbing an image online and using it as an overlay. I need to work on warping the texture even more. Also need more work with the top eye lid.